

Table of Contents
- What You'll Need Before You Start
- Step 1: Disconnect Water Supply Hoses and Power
- Step 2: Drain Excess Water and Remove the Unit
- Step 3: Protect Floors and Navigate Narrow Staircases
- Step 4: Disassemble the Washing Machine for Weight Reduction
- DIY Removal vs. Appliance Removal Near Me
- Same Day Junk Removal for Your Old Washer
- Disposal and Recycling: When You Need Heavy Hauling Services
- Frequently Asked Questions
Last Updated: September 7, 2026
To remove washing machine units from a basement combines plumbing, heavy lifting, and navigating tight spaces. Most guides gloss over the physical realities of hauling a 200-pound appliance up a narrow staircase, where injuries and property damage happen. This guide from Mike's Top Junk Removal walks you through each stage.
The core challenge is managing the weight and bulk once the machine is free. A standard washing machine is dense, awkward to grip, and prone to leaking residual water. Before you start, assess the path from the basement to the exit; if there are tight corners or steep stairs, the disassembly steps below become essential.
What You'll Need Before You Start
Gathering the right tools prevents frustration and injury. You'll need an adjustable wrench or slip-joint pliers for the water hoses, a bucket and towels for residual water, and a screwdriver set for removing panels. An appliance dolly with a ratchet strap is critical, along with work gloves and sturdy footwear.
Step 1: Disconnect Water Supply Hoses and Power
Safety comes first. Unplug the washing machine from the electrical outlet and turn off the plumbing shut-off valves that supply water to the unit. These valves are typically located on the wall behind the machine. Once the water is off, use your wrench to disconnect the water supply hoses from the machine's inlet ports. Expect some water to spill from the hoses.
After the hoses are off, check the drain hose, which usually connects to a standpipe or laundry sink. Loosen the clamp and pull the hose free, allowing any remaining water to flow into a bucket. A common mistake is forgetting to drain the internal tub, which holds several gallons and adds significant weight.
Step 2: Drain Excess Water and Remove the Unit
Even after disconnecting the hoses, water remains in the tub and the pump. To drain it, tilt the machine backward and prop it against the wall, then place a shallow bucket under the pump filter access panel, typically located at the front bottom. Remove the panel and the drain plug to release the water. This can be messy, so towels are essential.
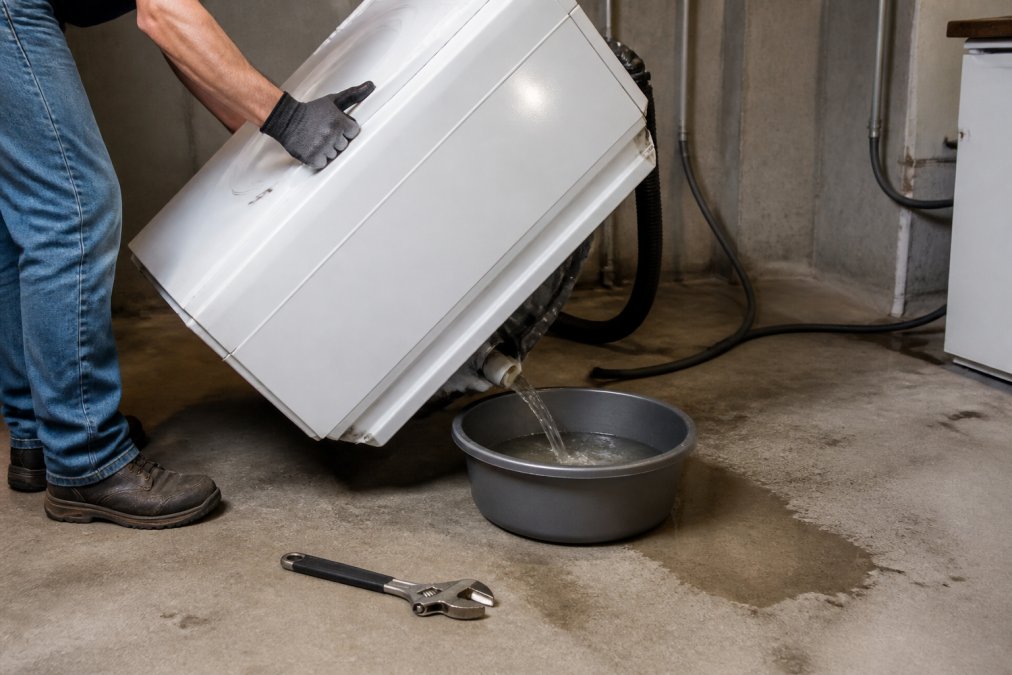
Once drained, move the machine to the base of the stairs with a clear path. If you're moving it up stairs, you'll need a second person. Check the structural integrity of the stairs before attempting to move the unit up; they must be solid and capable of supporting the combined weight of the machine and the people moving it.
Step 3: Protect Floors and Navigate Narrow Staircases
Moving a 200-pound appliance up a tight basement stairwell is the highest-risk part of the job. A washing machine's center of gravity is high, and on a 35-degree stair slope, the effective weight you're managing increases dramatically.
Assess the Staircase Before You Lift
Before you tilt the machine onto the dolly, inspect the stairs. Older homes often have basement stairs with 2x10 or 2x8 stringers spaced 24 inches apart. While generally sound for foot traffic, they may not handle a concentrated, dynamic load of 400-plus pounds.
- Check for flex: Have a helper stand at the top of the stairs while you walk up and down. If you feel any bounce or hear creaking beyond the normal, you need to reinforce the path or change your strategy.
- Inspect stringers and treads: Look for cracks, rot, or water damage, especially where the stringers meet the floor. A compromised stringer is a critical failure point.
- Measure the path: Use a tape measure to check the width of the staircase, the height of the ceiling at the top of the stairs, and the depth of any landings. A standard washing machine is about 27 inches wide and 34 inches tall. You need at least 3 inches of clearance on each side and above the machine to maneuver it effectively.
Floor and Stair Protection Strategies
The friction of a 200-pound load rolling across a floor can gouge concrete, scuff hardwood, and tear carpet. The goal is a low-friction, high-protection path.
- For the basement floor: Lay down 3/8-inch plywood sheets or heavy-duty 6-mil plastic sheeting. Plywood distributes the weight and protects the floor from scratches if the machine slips off the dolly. Cardboard is less effective; it compresses and tears quickly under this kind of load.
- For the stairs: This is where most damage occurs. The edge of each tread is vulnerable to impact from the dolly's wheels. Protect each stair tread with a piece of 1/4-inch hardboard or a thick rubber stair tread cover. Secure them with painter's tape, not duct tape, which can leave a sticky residue.
- Use a stair ramp: A dedicated appliance stair ramp (often rented from equipment supply houses) is the single best tool for this job. It bridges the gap between the floor and the first step, allowing you to roll the dolly up smoothly instead of bumping it over the lip. If you don't have a ramp, a 2x10 plank laid flat can serve as a temporary bridge, but it must be secured to the floor to prevent slipping.
The Two-Person Stair Navigation Technique
Never move a washing machine on stairs with only one person. You need a minimum of two people, ideally three: one to pull from the top, one to push from the bottom, and one to spot the dolly's wheels.
- Secure the machine to the dolly: Use a ratchet strap around the body of the machine, not just the top. The strap should be tight enough that the machine cannot shift independently of the dolly.
- Position the dolly: Tilt the machine back onto the dolly so the weight is on the wheels. The person at the bottom controls the tilt; the person at the top guides the dolly.
- Ascend in a controlled manner: The person at the top pulls the dolly by the handles, using their legs, not their back. The person at the bottom pushes the dolly's frame, not the machine itself, to avoid damaging the panels. The spotter watches the wheels and ensures they stay on the ramp or the center of the treads.
- Pivot at the landing: The most dangerous moment is the transition from the stairs to the upper floor. If the landing is tight, you may need to pivot the dolly 90 degrees. Do this slowly, with the person at the top taking the full weight while the person at the bottom steadies the base. Never try to muscle the machine through a turn; if it doesn't fit, stop and reassess.
A Unique Angle: The Staircase Weight Test
Before committing to the full move, perform a simple test. Have your helper stand at the top of the stairs. You, at the bottom, tilt the empty dolly back and rest its wheels on the first step. Then, apply downward pressure on the handles. If you feel any unusual give or hear structural noises from the stairs, stop. This test simulates the initial point of load transfer and can reveal weaknesses not visible during a casual inspection. If the stairs fail, your only safe options are to disassemble the machine into lighter parts or to call a professional crew.
Step 4: Disassemble the Washing Machine for Weight Reduction
A significant portion of a washing machine's weight is removable. Disassembling the unit into lighter components is the most effective strategy for navigating narrow staircases, protecting your back, and avoiding damage to your home.
Why Disassembly Works: Understanding the Weight Distribution
A typical top-load machine weighs 150 to 200 pounds; a front-load machine can weigh 250 pounds or more. The weight is not distributed evenly, with the bulk coming from the concrete counterweights and the electric motor.
- Concrete counterweights: These are 20- to 40-pound blocks bolted to the top and bottom of the tub. Their purpose is to stabilize the drum during the spin cycle. They are the single heaviest removable components.
- Drive motor: A modern washing machine motor can weigh 15 to 25 pounds. It is usually mounted to the bottom of the tub and is accessible once you remove the back panel.
- Transmission (on older models): If you have a machine from the 1990s or earlier, it may have a separate transmission that adds another 20 to 30 pounds.
Removing the counterweights and motor can reduce the chassis weight by 40 to 60 pounds, making it easier to remove washing machine parts down a narrow stairway. This changes the physics of the stair climb, making it safer for you and the stairs.
Step-by-Step Disassembly for Weight Reduction
This requires socket wrenches (typically 8mm, 10mm, and 13mm), a Phillips-head screwdriver, and a flat-head screwdriver. Work in a clear area with good lighting, and always unplug the machine and disconnect the water hoses first.
1. Remove the Top Panel
The top panel is usually secured by two or three Phillips-head screws at the back edge. On some models, there are also clips at the front. Slide the panel forward and lift it off. Set it aside; it is lightweight but bulky.
2. Remove the Back Panel
The back panel is held on by a series of Phillips-head screws around the perimeter. Removing it gives you access to the motor, the pump, and the counterweights. Keep the screws in a small container so they don't get lost.
3. Remove the Concrete Counterweights
You will see the counterweights as gray concrete blocks. On top-load machines, there is often a large one at the top of the tub and a smaller one at the bottom. On front-load machines, the counterweights are typically on the front and back of the tub.
- Top counterweight: Use a socket wrench to remove the bolts securing it to the tub. These bolts are usually 10mm or 13mm. Have a helper support the weight of the block as you remove the last bolt, as it will drop suddenly.
- Bottom counterweight: This is accessed from the back. It may be bolted to the bottom of the tub or to the frame. Remove the bolts and lift the block out.
4. Disconnect and Remove the Drive Motor
With the back panel off, you can see the motor mounted at the bottom of the unit. It is connected to the tub or transmission by a drive belt.
- Remove the drive belt: Loosen the tensioner pulley (usually a 10mm or 12mm bolt) and slide the belt off the motor pulley and the drum pulley.
- Disconnect the wiring: Label the wires with tape or take a photo with your phone before disconnecting them. Most motors have a single multi-pin connector that is easy to unplug.
- Remove the motor mounting bolts: The motor is held in place by two or three bolts. Support the motor with one hand while you remove the bolts with the other. The motor will drop once the last bolt is free.
5. Remove the Door on Front-Load Machines
For front-load machines, removing the heavy glass door is essential. The door is held on by two or three screws accessible from the inside of the door frame. Open the door fully, locate the screws, and remove them. The door will lift off. This not only reduces weight but also eliminates the risk of the door swinging open and hitting a wall or a person during the move.
What to Do with the Disassembled Parts
Once broken down, you have several lighter loads: the main chassis (now 100-140 pounds) on the dolly, the counterweights on a hand truck, and the motor and door carried by a single person. This makes navigating tight corners easier.
This disassembly process is the definitive answer to getting a heavy machine up a narrow staircase. It is more time-consuming than a direct haul, but it is the safest and most controlled method for a DIY homeowner.
DIY Removal vs. Appliance Removal Near Me
Deciding between DIY and professional removal comes down to your physical capability, the path's complexity, and your tolerance for risk. DIY is only practical with a helper, an appliance dolly, and a straightforward route.
If the path involves multiple turns, steep stairs, or concerns about lifting heavy weight, searching for "appliance removal near me" is the safer route. Professional teams bring the right equipment and experience to handle awkward loads without damaging your home, and they handle disposal too.
Same Day Junk Removal for Your Old Washer
Once the machine is out, you still need to dispose of it responsibly. Many municipalities have specific regulations for appliance disposal, as components can harm the environment if not handled correctly. This is where a same day junk removal service becomes invaluable.
Mike's Top Junk Removal offers same-day and next-day availability for appliance pickup. Our team handles the heavy lifting and ensures your old washer is transported to a facility that recycles the metal and disposes of components per environmental regulations. This is particularly useful for property managers clearing out units efficiently.
Disposal and Recycling: When You Need Heavy Hauling Services
Washing machines are largely recyclable but require specialized handling to remove the motor, wiring, and drum before the steel frame can be processed. Improper disposal, such as leaving the appliance on the curb for bulk trash pickup, often sends it to a landfill.
For those without a truck or the time to navigate local disposal rules, heavy hauling services are the answer. The crew arrives with a truck, loads the appliance, and takes it to an appropriate recycling facility.
Removing a washing machine from a basement is a test of preparation and physical effort. The safe path involves proper tools, careful draining, and a realistic assessment of your route and limits. When the task exceeds what you can safely manage, or when you need the unit hauled away the same day, professional junk removal removes the strain. Mike's Top Junk Removal does all the heavy lifting, so you can reclaim your space without the risk.
Frequently Asked Questions
Can I remove a washing machine myself?
Yes, you can remove a washing machine yourself if you have the right tools, an appliance dolly, and at least one strong helper. The challenge is navigating narrow staircases with a unit that can weigh 200 pounds or more. You'll also need to handle proper disposal, which many municipalities regulate. If you have any doubts about your ability to handle the weight or stairs safely, professional appliance removal services are a safer choice.
How do I prepare a washing machine for removal?
Start by unplugging the unit and turning off the plumbing shut-off valve. Disconnect the water supply hoses and drain any excess water from the drain hose. Remove loose items from the top and secure the drum with transport bolts if you still have them. Tape the lid and door closed, then wrap the unit in moving blankets to protect both the machine and your walls during transport.
What are the safety risks of moving heavy appliances up basement stairs?
The main risks are back injuries from heavy lifting, crushed fingers, and damage to your home. A washing machine can weigh 150 to 200 pounds, and carrying it up a narrow staircase creates awkward weight distribution. There's also risk of the machine tipping backward on the stairs. Professional removal teams use appliance dollies, proper lifting techniques, and safety gear to manage these risks.
How much does it cost to remove an old washing machine from a basement?
Professional removal costs depend on the difficulty of access and your location. Most junk removal companies include appliance pickup as part of their residential junk removal service, so you pay one price for the full job rather than a separate fee per item. Mike's Top Junk Removal offers free estimates and upfront pricing, so you know the exact cost before any work begins. Same-day and next-day appointments are available.