

Table of Contents
- Step 1: Inspect Your Space and Plan the Removal Route
- Step 2: Prepare Your Workspace and Clear Pathways
- Best Floor Protection for Heavy Debris Removal
- How to Protect Walls During Furniture Moving
- Step 3: Sort, Categorize, and Handle Hazardous Materials
- Junk Removal Liability Insurance and Your Protection
- Step 4: Prevent Structural Damage and Common Removal Mistakes
- Conclusion
Last Updated: August 16, 2026
Property damage during junk removal is one of the most common concerns homeowners face when clearing out bulky items. Whether you're removing old furniture, appliances, or renovation debris, the risk of scratches, dents, and structural damage can escalate quickly without proper planning. This guide from Mike's Top Junk Removal covers seven practical steps to prevent property damage during junk removal, protecting your floors, walls, and home's structural integrity throughout the process.

Most damage is preventable with straightforward preparation and the right protective techniques. Below, we'll walk you through exactly how to safeguard your property before, during, and after removal.
Step 1: Inspect Your Space and Plan the Removal Route
Before anything leaves your home, conduct a thorough site inspection to identify potential hazards and bottlenecks. Walk through your entire removal path from the item's current location to the exit point. Measure doorways, hallways, and stairwells. Note low-hanging fixtures, light fixtures, ceiling fans, and architectural features that could be damaged. Check for tight corners where large furniture might catch drywall or trim.
Identify the safest exit route. The shortest path isn't always the best if it requires navigating narrow spaces or multiple turns. A longer route through wider hallways often prevents damage better than forcing items through constrained areas. Mark any obstacles: baseboards, handrails, bannisters, or protruding hardware.
Assess your flooring type. Hardwood, tile, laminate, and carpet all require different protection strategies. Delicate surfaces like polished hardwood or marble demand more aggressive protection than vinyl or concrete. Document the condition of your floors before removal begins; photograph them if possible. This creates a baseline if damage disputes arise later.
Check for structural concerns like sagging doorframes or weak flooring sections. Heavy items like appliances require careful planning to avoid overloading floor joists or creating dents in subflooring. Plan your removal sequence by removing smaller items first to clear pathways and reduce congestion, giving your removal team space to maneuver larger pieces without rushing.
Step 2: Prepare Your Workspace and Clear Pathways
Clear all obstacles from pathways before removal begins. Move smaller items, toys, pet beds, and decorative objects out of the way. Remove doors from their hinges if they obstruct the removal path, as a closed door in a narrow hallway forces movers to angle furniture awkwardly, risking wall and door frame damage.
Protect light fixtures and ceiling fans by wrapping them with plastic or cardboard if they hang low in removal pathways. Clear the exterior space where items will be staged by removing parked cars, trash cans, and yard furniture from the loading area. Notify neighbors if you're removing large items from a shared building.
Test your planned route with a mock-up. If possible, use a large cardboard box or similar-sized object to simulate the dimensions of your largest item and walk it through your planned path. This reveals real-world constraints that measurements alone might miss.
Best Floor Protection for Heavy Debris Removal
Floor protection is non-negotiable when moving heavy furniture and debris. The most effective strategy combines multiple layers: start with a base layer of plywood or hardboard at least ½-inch thick for heavy appliances to distribute weight across a wider surface area, preventing concentrated pressure that creates dents or gouges.
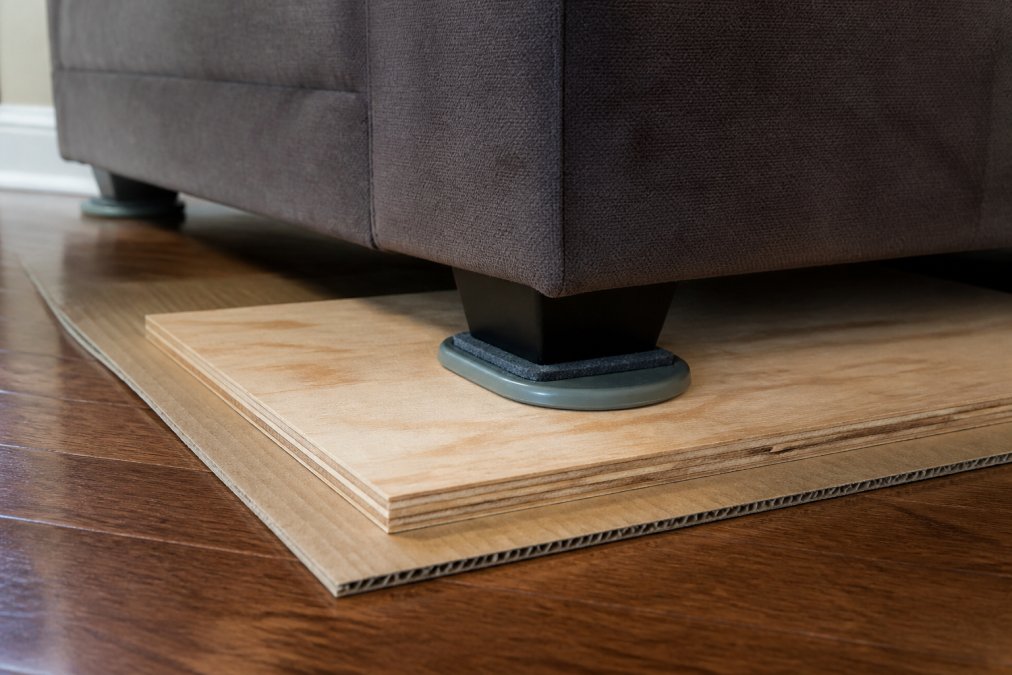
Furniture sliders go on top of the plywood. These plastic or felt-bottomed devices allow items to glide rather than drag, eliminating friction that scratches floors. Position sliders under all four corners of furniture pieces. Cardboard provides a protective layer between furniture and plywood, creating a buffer that absorbs minor impacts.
For appliances, use a combination of plywood, cardboard, and sliders. Refrigerators, washing machines, and heavy dryers concentrate enormous weight in a small footprint. A ½-inch plywood base plus furniture sliders is the minimum protection; for particularly heavy appliances, consider using moving dollies with pneumatic wheels.
Protect carpet with heavy plastic sheeting or rosin paper to prevent dirt transfer and moisture damage. Test your floor protection before moving items by placing a protected piece of furniture in your pathway and sliding it several feet to ensure the protection system stays in place.
How to Protect Walls During Furniture Moving
Walls suffer damage during removal when furniture contacts drywall, paint, or trim. Start with corner guards, foam or plastic protectors that fit over inside and outside corners, absorbing impact from furniture edges. Install them at all corners along your removal route.
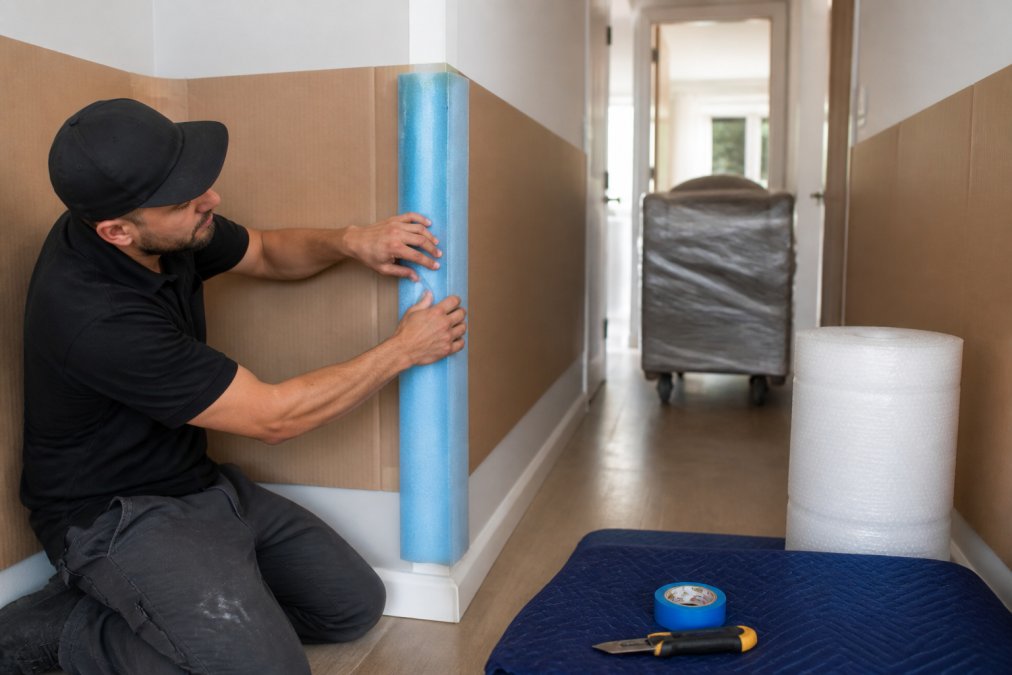
Use furniture blankets, moving blankets, or foam padding on walls, securing them with painter's tape rather than duct tape, which can damage paint. Cover wall sections where furniture will pass, particularly around doorways and tight turns. Protect doorframes and trim with cardboard, and use door frame protectors for exterior doors.
Manage furniture angles carefully, the most common wall damage occurs when movers pivot furniture too sharply. For narrow hallways, remove baseboards if possible to increase effective clearance. Protect stairwell walls with padding, paying special attention to inside corners where furniture edges tend to catch.
Step 3: Sort, Categorize, and Handle Hazardous Materials
Proper sorting prevents damage caused by improper handling and protects your team from safety hazards. Begin by categorizing items into groups: furniture, appliances, electronics, yard waste, construction debris, and hazardous materials.
Hazardous materials require identification and safe handling. Common household hazardous items include paint, solvents, batteries, fluorescent bulbs, refrigerants, and pesticides. Drain all fluids from appliances before removal, refrigerators contain refrigerant that must be recovered by certified technicians, and washing machines and dishwashers hold water that can spill during movement.
Secure loose parts on furniture and appliances. Remove drawers from dressers and desks to reduce weight and prevent them from sliding open during movement. Wrap table legs with moving blankets to prevent them from puncturing walls or floors. Separate recyclables from items destined for disposal, as many junk removal services, including Mike's Top Junk Removal, handle sorting and recycling as part of the removal process.
Document valuable items before removal by photographing them and noting their condition. Create a staging area for items leaving your home, organizing them by removal sequence with items leaving first placed nearest the exit.
Junk Removal Liability Insurance and Your Protection
Understanding liability during junk removal protects you financially if damage occurs. Most standard homeowner's insurance policies cover accidental damage to your property caused by others, but coverage varies significantly. Review your policy's liability section and call your insurance provider to ask explicitly whether damage caused by junk removal contractors is covered.
Professional junk removal companies typically carry their own liability insurance covering damage caused by their employees or contractors during the removal process. Before hiring any service, request proof of liability insurance and verify that the coverage amount is sufficient for your property's value.
Document your property's condition before removal begins by taking photographs and video of all rooms, focusing on floors, walls, and items near the removal pathway. Get a written estimate that includes liability terms, specifying what's covered if damage occurs. Consider purchasing additional coverage if your homeowner's policy has gaps, as some insurance companies offer temporary additional liability coverage for specific events like junk removal.
Step 4: Prevent Structural Damage and Common Removal Mistakes
Structural damage to your home's framework, flooring, and load-bearing elements is the most serious and expensive type of damage. The most common structural mistake is overloading pathways, a refrigerator weighing 300 pounds with a 3-square-foot footprint creates 100 pounds per square foot of pressure. A 4-foot by 4-foot plywood sheet spreads the same refrigerator across 16 square feet, reducing pressure to under 20 pounds per square foot.
Never drag heavy items directly across flooring without protection, as dragging creates concentrated pressure lines that can crack tile, gouge hardwood, or tear carpet. Avoid tilting furniture excessively on stairs, when moving furniture up or down stairs, tilt it at a shallow angle to keep weight distributed across multiple steps.
Watch for moisture damage from appliances and items stored in damp areas that often sweat condensation during removal. Use absorbent materials under appliances and dry floors immediately after removal. Inspect items before removal to prevent pest infestation from spreading to clean areas of your home.
Measure furniture dimensions and compare them to your pathways before attempting to move items, as a couch that looks like it should fit through a doorway often doesn't when you account for its actual depth and the angle required for passage. Never remove load-bearing walls or structural supports without professional assessment.
Preventing property damage during junk removal comes down to planning, protection, and careful execution. The steps outlined here, inspecting your space, protecting floors and walls, handling hazardous materials responsibly, and understanding liability, address the most common damage scenarios. When you're ready to remove junk, Mike's Top Junk Removal provides professional service with same-day and next-day availability, transparent upfront pricing, and experienced teams trained in damage prevention. Get your free estimate today and reclaim your space with confidence.
Frequently Asked Questions
What are the best ways to protect hardwood floors during heavy furniture removal?
Use furniture sliders under heavy items to distribute weight evenly and reduce friction. Layer cardboard, plywood, or specialized floor protection sheets across your entire pathway. Combine these methods for maximum protection: sliders handle the weight distribution, while protective sheets guard against scratches and moisture damage. Remove protection layers only after all items have been moved to prevent tripping hazards.
Are junk removal companies liable for property damage?
Yes, reputable junk removal companies carry liability insurance to cover accidental damage to your property. Before hiring, verify their junk removal liability insurance coverage and ask for proof of current policies. Understand what their coverage includes, some policies cover drywall damage and scratches, while others have limits. A professional service like Mike's Top Junk Removal operates with full transparency about liability protection.
What safety precautions should I take when clearing debris from my home?
Wear sturdy footwear, work gloves, and appropriate personal protective equipment for your specific debris type. Clear pathways of obstacles before removal begins to prevent tripping and falls. Identify hazardous materials like asbestos, chemicals, or broken glass and isolate them. Use proper lifting techniques with bent knees, never twist your spine when carrying heavy items, and ask for help with bulky furniture to prevent injury and property damage.
How should I prepare my home to avoid scratches and damage during removal?
Start with a site inspection to identify vulnerable areas: hardwood floors, baseboards, doorframes, and corners. Apply protective padding to corner edges and doorways where furniture will pass. Lay floor protection materials wall-to-wall on your entire removal route. Remove light fixtures or decorations in tight spaces. Brief the removal team on your home's layout and any areas of concern. These preparation steps reduce the risk of dents, scratches, and structural damage significantly.
This article was written using GrandRanker